
| 일 | 월 | 화 | 수 | 목 | 금 | 토 |
|---|---|---|---|---|---|---|
| 1 | ||||||
| 2 | 3 | 4 | 5 | 6 | 7 | 8 |
| 9 | 10 | 11 | 12 | 13 | 14 | 15 |
| 16 | 17 | 18 | 19 | 20 | 21 | 22 |
| 23 | 24 | 25 | 26 | 27 | 28 |
- pyside6 ui
- django
- 장고로 ERP
- test drive development
- django erp
- orm 최적화
- pip 설치
- optimization page
- qwindows.dll
- django drf
- QApplication
- pyside6
- 페이지 최적화
- qpa_plugin
- query 최적화
- materialized
- channels
- 중량 관리
- django test
- Python
- 재고 관리
- pip 오류
- Self ERP
- 장고
- ERP
- uiload
- tensorflow
- django rank
- 파이썬
- django role based
- Today
- Total
취미삼아 배우는 프로그래밍
Django 3.0 ASGI > 실시간 TodoApp 만들어보기 - 1 본문
1. 설치(Channels 공식사이트를 참고했다.)
https://channels.readthedocs.io/en/latest/tutorial/part_1.html
Tutorial Part 1: Basic Setup — Channels 2.4.0 documentation
In this tutorial we will build a simple chat server. It will have two pages: The room view will use a WebSocket to communicate with the Django server and listen for any messages that are posted. We assume that you are familiar with basic concepts for build
channels.readthedocs.io
- cmd > cd { project Folder}
- django-admin startproject config .
- django-admin startapp todoapp
- python -m venv myvenv
- cd myvenv
- cd scripts
- activate.bat
- cd ..
- cd ..
- (Project Path)
- python -m pip install --upgrade pip
- pip install django channels channels_redis
- code . (in vscode)
나의 경우 보통 초기 세팅은 cmd로 하는 편이다.
cmd를 통해 구성하고 싶은 폴더로 들어가서
django-admin startproject config .
을 통해 현재 폴더에 config라는 프로젝트를 생성한다.
그리고 django-admin startapp todoapp
을 통해 앱을 생성한다.
그 뒤,
python -m venv myvenv
를 통해 myvenv라는 가상환경을 만들고,
cd myvenv
cd scripts
activate.bat
를 통해 가상환경을 실행한 뒤, cd .. 으로 빠져나온다.
대충 이런 식으로 설정하고
python -m pip install --upgrade pip
를 통해 pip를 업그레이드 시키고,
pip install django channels channels_redis
를 통해 한 방에 원샷으로 장고, 채널스, 채널스레디스까지 모두 일괄 설치해준다.
그 다음에서야 Visual Code를
code . 이라는 명령어로 실행시킨다.
2. 세팅(초기 설정)
제일 먼저 필요한 것이 세팅이다.
# in settings.py

# ...
ALLOWED_HOSTS = ['*']
# ...

# ...
INSTALLED_APPS = [
	# ...
    'todoapp',  # 추가
    'channels', # 추가
]
# ...

TEMPLATES = [
    {
        'BACKEND': 'django.template.backends.django.DjangoTemplates',
        'DIRS': [os.path.join(BASE_DIR,'templates')],   # 추가
        'APP_DIRS': True,
        'OPTIONS': {
            'context_processors': [
                'django.template.context_processors.debug',
                'django.template.context_processors.request',
                'django.contrib.auth.context_processors.auth',
                'django.contrib.messages.context_processors.messages',
            ],
        },
    },
]

# ...
WSGI_APPLICATION = 'config.wsgi.application'
ASGI_APPLICATION = "config.routing.application" # 추가
CHANNEL_LAYERS = {  # 추가
    'default': {
        'BACKEND': 'channels_redis.core.RedisChannelLayer',
        'CONFIG': {
            "hosts": [('127.0.0.1', 6379)],
        },
    },
}

# .. STATIC 설정은 패스..
그리고 settings.py 옆에 routing.py를 작성해준다.
# config.routing
# filepath : config/routing.py

from channels.routing import ProtocolTypeRouter

application = ProtocolTypeRouter({
    # (http->django views is added by default)
})
setting.py 중
ASGI_APPLICATION = "config.routing.application" # 추가
이 부분은 바로 위에 작성한 routing.application을 일컫는거다.
3. TodoApp 만들기
3-1 TodoApp 모델 만들기
장고는 뭘 하려면 제일 먼저 세팅, 그다음 모델, 그다음 뷰, URL 세팅, 그리고 나머지 디테일은 html에서 처리해야 하는것 같다.
제일 먼저 만들어야 할 것은 모델이다.
모델은 그냥 간단히 만들어보았다.
# todoapp.models
from django.db import models
# Create your models here.
class ToDoAppModel(models.Model):
main_text = models.TextField(verbose_name="메인 텍스트")
is_checked = models.BooleanField(default=False)
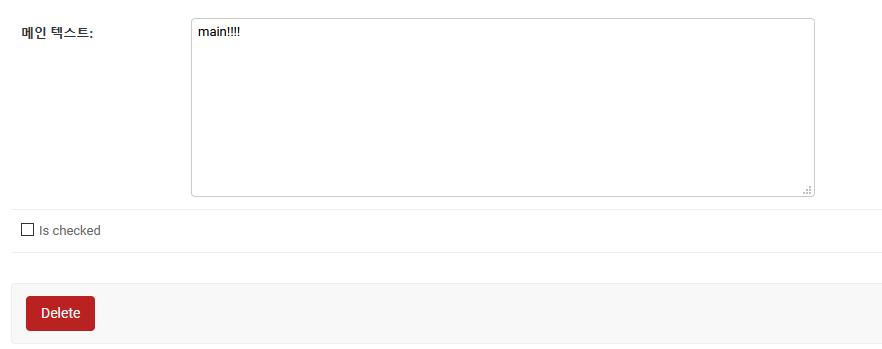
# todoapp.admin
# admin.py
## admin에 위의 모델을 등록하자.
from django.contrib import admin
from todoapp.models import ToDoAppModel
# Register your models here.
admin.site.register(ToDoAppModel)main_text가 있고, 위의 느낌의 check 박스용 체크 값이 있다. 디폴트 값이 있으므로, 그냥 따로 지정하지 않아도 된다.
3-2 Form 만들기
그다음은 뷰에 쓸 form 부터 만들어야겠다.
아무래도 귀찮으니까..
# todoapp.forms
# 작성
from django import forms
from todoapp.models import ToDoAppModel

class TodoAppForm(forms.ModelForm):

    class Meta:
        model = ToDoAppModel
        fields = ('main_text',)
일단은 뷰에서 써보자.
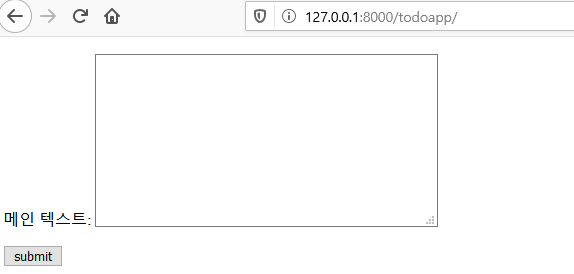
3-3 View 만들기
index 페이지부터 띄어보자.
# views.py
# todoapp.view

from django.shortcuts import render
from .forms import TodoAppForm

# Create your views here.
def index_view(request):
    form = TodoAppForm()
    context = {
        'form':form,
    }
    return render(request,"todoapp/index.html",context)
파일 위치를 잘 해야하한다.(폴더를 새로 만들어서 해야한다.)
<!-- todoapp > templates > todoapp > index.html -->
<!DOCTYPE html>
<html lang="en">
<head>
    <meta charset="UTF-8">
    <meta name="viewport" content="width=device-width, initial-scale=1.0">
    <meta http-equiv="X-UA-Compatible" content="ie=edge">
    <title>Document</title>

</head>
<body>

    <div>
        <form method="post" action="">
            {% csrf_token %}
            {{ form.as_p }}
            <input type="submit" value="submit">
        </form>
    </div>


</body>

</html>
그 다음 url 을 연결해주자.
# urls.py
# config.urls

from django.contrib import admin
from django.urls import path
from todoapp.views import index_view

urlpatterns = [
    path('admin/', admin.site.urls),
    path('todoapp/', index_view,name="index"),

]
python manage.py makemigrations
python manage.py migrate
python manage.py createsuperuser
해준 뒤, 뙇
물론 아직 저장이 되진 않는다.
모델 내 저장이 되는지 확인해보려면
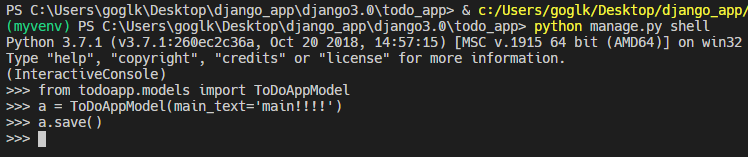
3-4 form 데이터 저장 및 저장 값 불러오기
이제 폼을 submit 하면서, 데이터를 저장하게끔 해보자.
아 그리고, 페이지 내에 결과값 들도 보여주도록 해보자.
# todoapp.views
# views.py
# 함수 수정
from .forms import TodoAppForm
from .models import ToDoAppModel
from django.shortcuts import render
def index_view(request):
form = TodoAppForm() # 폼을 불러오고
todo = ToDoAppModel.objects.all() # 모델 내 데이터들을 불러온다.
if(request.method == 'POST'): # 작성하는 부분
form = TodoAppForm(request.POST or None) # request가 POST면, 폼 안에 요청값을 넣는다.
if(form.is_valid()):
form.save() # 폼을 저장하고
form = TodoAppForm() # 폼을 전부 비운다.
context = {
'form':form,
'todo':todo,
}
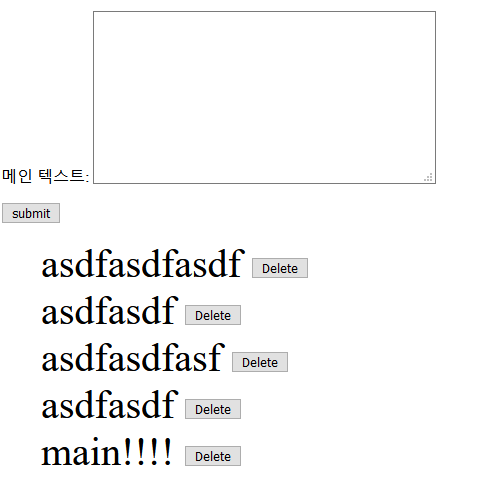
return render(request,"todoapp/index.html",context)todo 리스트를 출력하려면,
index.html 페이지도 손을 봐줘야한다.
<!-- todoapp > templates > todoapp > index.html -->
<!DOCTYPE html>
<html lang="en">
<head>
    <meta charset="UTF-8">
    <meta name="viewport" content="width=device-width, initial-scale=1.0">
    <meta http-equiv="X-UA-Compatible" content="ie=edge">
    <title>Document</title>

<style>
    .list li{
        display: inline;
        font-size: 40px;
        vertical-align: middle;
    }
    .list input{
        vertical-align: middle;
    }
    .list li .checked{
        text-decoration: line-through;
    }
</style>

</head>
<body>

    <div>
        <form method="post" action="">
            {% csrf_token %}
            {{ form.as_p }}
            <input type="submit" value="submit">
        </form>

        <ul class="list">
            {% for content in todo %}
            <li>
                <a class="">{{ content.main_text }}</a>
                <!-- <input type="button" value="Edit"> -->
                <input type="button" value="Delete" >
            </li>
            <br>
            {% endfor %}
        </ul>
    </div>


</body>

</html>
(CSS도 조금 손봐줬다. Edit은 하려다가 포기했다.)
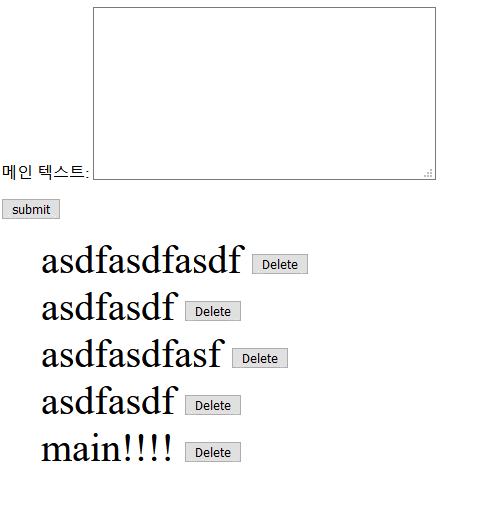
3-5 Delete버튼 작동
자 이제 저 Delete 버튼을 작동시킬 수 있게 해보자.
# todoapp.views
# views.py 추가

from django.http import HttpResponseRedirect # 추가

# ...
# ...

def deletetodo(request, todo_id ):
    # todo_id 를 URL로부터 받아서 삭제토록 한다.
    item_to_delete = ToDoAppModel.objects.get(id=todo_id)
    item_to_delete.delete()
    return HttpResponseRedirect('/todoapp/')


# config.urls
# urls.py 추가
from todoapp.views import index_view, deletetodo # 추가

urlpatterns = [
    path('admin/', admin.site.urls),
    path('todoapp/', index_view,name="index"),
    path('deletetodo/<int:todo_id>/', deletetodo), # 추가
]
url까지 한 방에 설정한다.
<int:todo_id> 이 뜻은
todo_id로 View 단에 넘기되, 이 형식은 int로 하겠다. 라는 뜻으로 이해하면 되겠다.
그리고 index.html에 스크립트 부분을 조금 추가해준다.
<!DOCTYPE html>
<html lang="en">
<head>
    <meta charset="UTF-8">
    <meta name="viewport" content="width=device-width, initial-scale=1.0">
    <meta http-equiv="X-UA-Compatible" content="ie=edge">
    <title>Document</title>

<style>
    .list li{
        display: inline;
        font-size: 40px;
        vertical-align: middle;
    }
    .list input{
        vertical-align: middle;
    }
    .list li .checked{
        text-decoration: line-through;
    }
</style>

</head>
<body>

    <div>
        <form method="post" action="">
            {% csrf_token %}
            {{ form.as_p }}
            <input type="submit" value="submit">
        </form>

        <ul class="list">
            {% for content in todo %}
            <li>
                <a class="">{{ content.main_text }}</a>
                <!-- <input type="button" value="Edit"> -->
                <input type="button" value="Delete" onclick="href_location({{ content.id }})">
            </li>
            <br>
            {% endfor %}
        </ul>
    </div>


</body>
<script>
    function href_location(id){
        current = window.location.href
        window.location.href = '/deletetodo/' + id + '/'
    }

</script>
</html>
3-6 Todoapp 중간완성
자, 일단 간단한 TodoApp을 만들었다.
언뜻 실시간 처럼 보이지만,
실시간이 아니다.
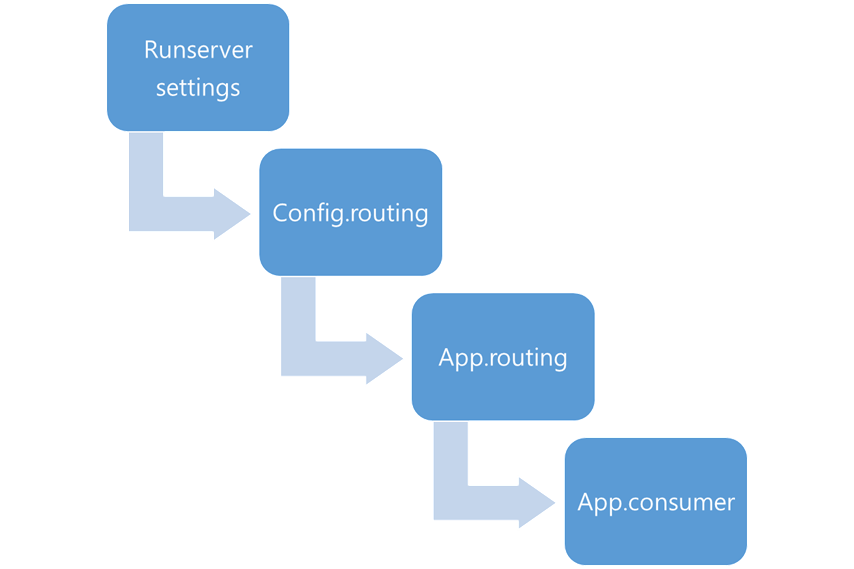
4-1 Channels routing 설정(공식홈페이지를 참고하였음)
# todoapp.routing
# routing.py
from django.urls import re_path, path

from . import consumer

websocket_urlpatterns = [
    path('ws/todoapp/', consumer.TodoConsumer),
]
todoapp 내에 routing.py 를 만든다
routing 은 url과 같은 기능을 한다.
consumer는 view와 같은 기능을 한다.
그래서, ws/todoapp/ 이라는 경로로 소켓이 접근 시 TodoConsumer를 실행시켜라
라는 의미와 같다.
이제 config.routing 내의 내용을 수정해보자.
# config.routing
# routing.py
from channels.routing import ProtocolTypeRouter
from channels.auth import AuthMiddlewareStack
from channels.routing import ProtocolTypeRouter, URLRouter
import todoapp.routing

application = ProtocolTypeRouter({
    'websocket': AuthMiddlewareStack(
        URLRouter(
            todoapp.routing.websocket_urlpatterns
        )
    ),
})
이제 위에서 정의한 TodoConsumer를 만들어보자.
4-2 TodoConsumer 작성
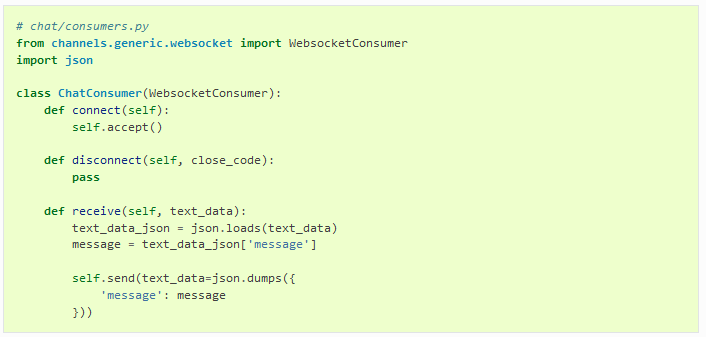
| Function | description |
| def connect(self) | 연결 시 호출되는 함수 |
| def disconnect(self, close_code) | 연결 해제시 호출되는 함수 |
| def receive(self, text_data) | 받을 수 호출되는 함수 |
정도다
이제 이걸 입맛에 맞게 바꿔보려 한다.
from asgiref.sync import async_to_sync
from channels.generic.websocket import WebsocketConsumer
import json

class TodoConsumer(WebsocketConsumer):
    def connect(self):
        print('someone connected!')
        #'/ws/todoapp/'
        self.room_group_name = 'todousers'
        async_to_sync(self.channel_layer.group_add)(
            self.room_group_name,
            self.channel_name
        )
        self.accept()

    def disconnect(self, close_code):
        async_to_sync(self.channel_layer.group_discard)(
            self.room_group_name,
            self.channel_name
        )

    # Receive message from WebSocket
    def receive(self, text_data):
        text_data_json = json.loads(text_data)
        message = text_data_json['message']
        print('receive_message')
        self.send(text_data=json.dumps({
            'message': message
        }))

        # Send message to room group
        async_to_sync(self.channel_layer.group_send)(
            self.room_group_name,
            {
                # running class below
                'type': 'todo_message',
                'message': message
            }
        )


    # Receive message from room group
    def todo_message(self, event):
        message = event['message']
        print('todo_message')
        # Send message to WebSocket
        self.send(text_data=json.dumps({
            'message': message
        }))
그리고, 정작 컨슈머를 만들어놓고 쓰질 못한다면 의미가 없다.
그래서 index.html에 사용하게끔 할 함수를 추가하고, 구동해본다.
<!DOCTYPE html>
<html lang="en">
<head>
    <meta charset="UTF-8">
    <meta name="viewport" content="width=device-width, initial-scale=1.0">
    <meta http-equiv="X-UA-Compatible" content="ie=edge">
    <title>Document</title>

<style>
    .list li{
        display: inline;
        font-size: 40px;
        vertical-align: middle;
    }
    .list input{
        vertical-align: middle;
    }
    .list li .checked{
        text-decoration: line-through;
    }
</style>

</head>
<body>

    <div>
        <form method="post" action="">
            {% csrf_token %}
            {{ form.as_p }}
            <input type="submit" value="submit">
        </form>

        <ul class="list">
            {% for content in todo %}
            <li>
                <a class="">{{ content.main_text }}</a>
                <!-- <input type="button" value="Edit"> -->
                <input type="button" value="Delete" onclick="href_location({{ content.id }})">
            </li>
            <br>
            {% endfor %}
        </ul>
    </div>

    <input type="button" value="socket test" onclick="todoSocket_test()">

</body>
<script>
    function href_location(id){
        current = window.location.href
        window.location.href = '/deletetodo/' + id + '/'
    }

    var todoSocket = new WebSocket(
        'ws://' + window.location.host +
        '/ws/todoapp/');

        todoSocket.onmessage = function(e) {
        var data = JSON.parse(e.data);
        console.log(data);
        // var message = data['message'];
    };

    todoSocket.onclose = function(e) {
        console.error('Chat socket closed unexpectedly');
    };

    function todoSocket_test(){
        todoSocket.send(JSON.stringify({
            'message': 'testtest!!'
        }));
    }
</script>
</html>
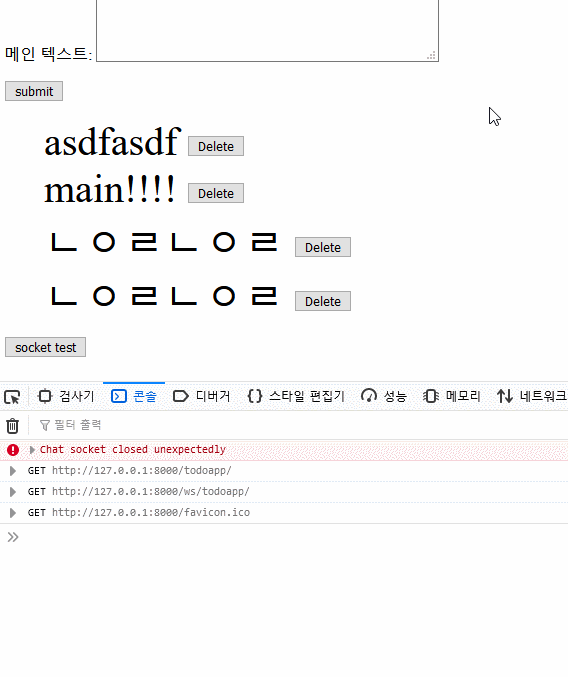
자
이처럼 연결도 정상적으로 진행되고, 메세지도 잘 보내진다.
하지만, 메세지가 두 번씩 보내지는데 이 이유는 무엇일까?
프론트단(html)에서 만든 소켓은 요청(request)를 한다. (이러이러한 자료를 보낸다.)
그리고, 서버단(Consumer)에서는 이 요청을 받는다.(receive)
하기 때문에, receive가 먼저 실행된다.
그 뒤 설정한 그룹에 속한 이들에게 메세지를 전송하게 되며,
todo_message(self, evnet)를 호출하게 된다.
이 todo_message는 따로 분기하여,
삭제할건지 내용을 추가할 건지 따로 정의해 분기시킬 수 있게끔 해준다.
결국, 위에서 send가 두번 쓰였기 때문에 사용자가 두 번의 요청을 받는 것인데,
이를 구분해보자면,
| send 종류 | 설명 |
| self.send | 전체 채널 이용자에게 전달 |
| async_to_sync(self.channel_layer.group_send) | 명명한 그룹 이용자에게만 전달 |
하는 역할을 한다.
지금은 채널 그룹을 하나만 쓸 예정이기에 뭘 써도 사실상 관계는 없어보인다.
이제 [추가, 삭제] 와 관련한 consumer를 작성해보자.